Valkyrie Riders Cruiser Club
April 23, 2025, 08:26:06 AM *
Welcome, Guest. Please login or register.

Login with username, password and session length
Ultimate Seats Link VRCC Store
Homepage : Photostash : JustPics : Shoptalk : Old Tech Archive : Classifieds : Contact Staff
News: If you're new to this message board, read THIS!
 
Inzane 25
Pages: [1]   Go Down
Send this topic Print
Author Topic: Duck Head for Harbor Freight Tire Changer  (Read 1901 times)
Peteg
Member
*****
Posts: 211


« on: February 12, 2025, 12:35:06 PM »

I’ve been changing tires for a few years now. I’m probably someone who shouldn’t waste my time, but ever since I swore I would never set foot in local motorcycle shop again I’ve been on a learn to change tire’s crusade. The past couple of years I’ve been working with a Harbor Freight motorcycle changer trying to make a bar that works efficiently. Inevitably I wind up giving up and using tire irons. I get the tires changed but by the end of the day I’m cursing never again. Recently I’ve been working with a duck head on a bar. My very limited strength seemed to be going mostly toward pulling the duck head out. After that experience I came up with some really cheap easy ways to improve both the harbor freight changer and convert it to a manual duck head machine. I’ll try and explain with pictures as follows, but I’m also looking for input as I noticed an old VRCC thread indicating a number of members are years ahead of me.

I’m really optimistic about this prototype but I don’t plan to use it until April or May when I do the front tire. I plan to have both disks and wheel bearings installed when I change the tire even though  I’ll be changing out the 26 year old bearings. My wife’s take is you were really optimistic the last 4 times too. If you look at the pictures it will become very obvious that I can’t weld. Once I’m happy with the modifications I could always take it to my neighbor.

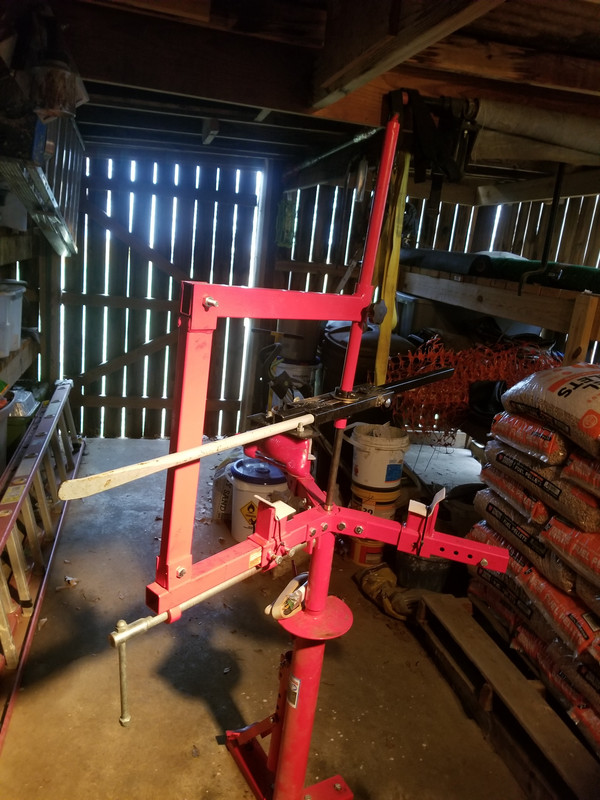
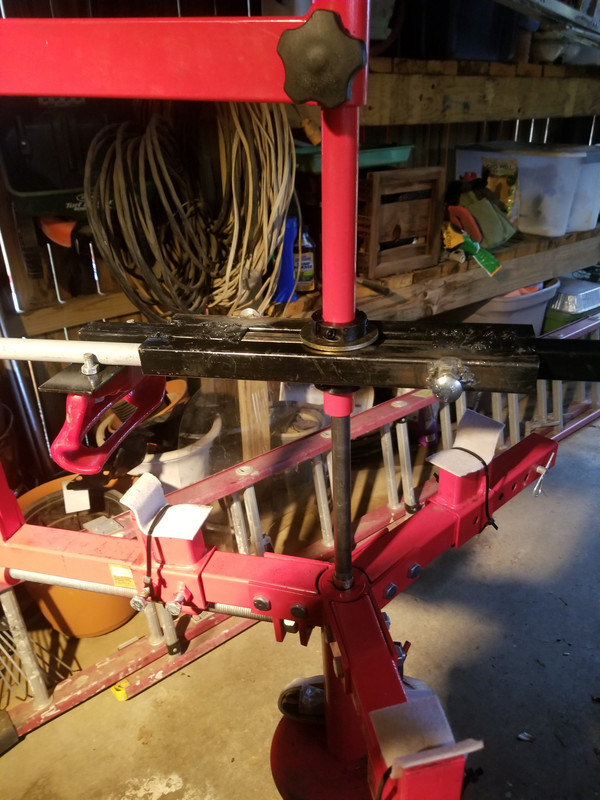
Tire machine changes: To fix the fact that the holes for the 2 stationary feet never allow my wheels  to center, I remove the clevis pins completely. Then I use the adjustable clamping foot to center the wheel. Next I ratchet strap around all 3 feet to bring the 2 loose clamps in to clamp the wheel. The feet lean out and try to push the wheel up as opposed to clamping so I cinch the wheel down at each changer arm which also keeps the wheel from rotating. I got cheap 3m furniture glide material to protect the wheel. The cinch down also holds the tire off the lower bead (as the feet stick up into the tire) so you only have to worry about tire ride up the upper bead.  I deal with the center bar being too wide to go through the wheel bearings by tuning it upside down IE hollow side down, threaded side up.  I have a 3/8” x12” threaded nipple that goes through the bearings  into the hole in the center of the changer and center bar. I have 3/8” brass caps on both ends of the nipple that I rounded with a grinder for a snug fit. One of the really cool parts is the bar slides up and down until you lock it in place up top so it becomes the height adjustment for the duck head. No modification required.

If you don’t have space or money for a tire changer I would think you could try mounting a 3/8” threaded flange to a ¾” piece of plywood, then 3/8” x12” nipple possibly bell reducer up to a ¾” pipe nipple for your bar rotation center. Maybe have holes for cinch straps and plywood stand offs to keep the tire and wheel up.

Duck head changes: I wanted a center rotation adjustable machine as I didn’t want to have to pivot the head for wheel size. Did I mention I can’t weld; so complicated fabrication is out of the question? I welded 4 pieces of 1” 16 ga sq tube together leaving a slide area to compensate for all my wheels. I had to make the center slot slightly wide with shims as the HF center bar is slightly wider than the square tube. 1” split collars and washers work great for the HF center bar, completing the duck head vertical adjustment / rotation bearing. I use ¾” sq tube slides for the duck head horizontal adjustment with plastic end caps at the bearing points. The slide bars are locked in place by 3/8” bolts with nuts welded to the mount / demount bar. I have a big tire iron in the 1” bar at the head showing that I’ll be able to shift my rotation leverage to the head if I need to push on the tire with the head hung up.

I’m also looking to change 12” trailer tires. Does anyone have any recommendations on small wheel heads?


The attached video is really good! The presenter probably has a business that justifies him buying so many kits to come up with one system that works. This is definitely the more professional way to go!

https://www.youtube.com/watch?v=0GUHrOox5W8
Logged
longrider
Member
*****
Posts: 555


Vernon, B.C. Canada


« Reply #1 on: February 13, 2025, 02:58:40 AM »

I have the HF tire changer.  I made plenty of modifications.   In the early 2000’s the local Honda dealer had a well used air operated changer that most likely had no maintenance.  They spun  the rim twice in one year tearing aluminum along the way.  They had it repaired later that year (winter)     I bought the HF and did this.   I purchased a heavy duty nylon cutting board like my wife uses.  Cut 3 pieces 2”x3”.   Cut 3 pieces 2”x2 1/2.    Cut 3 pieces of rubber 3/4” thick and 2x2.  Lined up all  against a vertical back with the rubber in the center  and drilled a 3/8 hole through the three pieces.   I then duplicated the screw mechanism in the other two spokes in the changer to match what the HF already had.   Now I could center the rim in  alignment hole as each spoke is adjustable and squeeze the rim nicely   The three nylon rubber pieces are bolted to the capture plates on each of the three spokes.   The rim will be captured in between the nylon against the rubber and will not slip.  I made up my own center rod from stock I had laying around and threaded to match.    And I bought a NOMAR tire bar.   Best EVER.    Tire soap and black rim sealer and I’ve got the best manual system ever.    To anchor the HF I bought some 2” square tube 3’ long and I welded a pivot at the changer to fold it up and pin in both the vertical and horizontal.   2” square tube goes into the receiver of my truck.  Nice and solid easy to store 
Logged
Peteg
Member
*****
Posts: 211


« Reply #2 on: February 13, 2025, 03:04:09 PM »

Thanks! That gives me lots to consider moving ahead. I've got an alternative to the ratchet strap that will allow use of the intended vise system if necessary. I originally intended to get a Nomar bar with the Harbor Freight Machine after I bought a VTX. I couldn't do the VTX tires with tire irons on the floor of my shop like my Triumph. I took the tires to this guy Cliff who has a mobile business. He threw my tires on the wood floor of his trailer picked up a couple of tire irons and had them both done in less than 10 minutes. I asked him why he didn't use his Nomar manual changer and bar. He said my spoked wheels would cut the tips off his bar. Maybe I should have gotten the bar anyway. Now I'm pretty invested in the duck head. If I don't get there I might try the Nomar bar.   
Logged
JimC
Member
*****
Posts: 1816

SE Wisconsin


« Reply #3 on: February 13, 2025, 04:45:05 PM »

I also made a few changes to the HF machine.
What I found that made it work great was lashing the wheel down tight to one or two of the three arms through the spokes of the wheel onto the machine with leather straps so it could not slide or spin at all.
JIM
Logged

Jim Callaghan    SE Wisconsin
longrider
Member
*****
Posts: 555


Vernon, B.C. Canada


« Reply #4 on: February 13, 2025, 04:48:31 PM »

The NOMAR cones with a replaceable nylon end and one spare end.  I’ve used it now for at least 60 tires and the original nylon end is still on it.  Cannot mark the rim at all with nylon.  Just saying. I am not at home until April.  If you need pics just  PM me and I’ll take a couple photos then

Warren
Logged
Peteg
Member
*****
Posts: 211


« Reply #5 on: February 14, 2025, 12:19:39 PM »

Warren, your descriptions were very clear. I wouldn't mind seeing your setup sometime in the future if it's no trouble to make a post though. After seeing your last post I'll definitely try the Nomar Bar if my duck head doesn't work for me. Cliff is twice my size and 1/2 my age. He's so good with tire irons I bet he rarely uses his tire changer. Often the operator is more important than the actual tool. Easter 2010 my wife and I were stuck on the side of the road just south of Dayton on the way from Texas to the Florida Keys with our sailboat & trailer in tow. I was running a set of Carlisle China bombs. The bombs started going off like it was Independence day not Easter. You don't know what you don't know. Anyway when the roadside assistance guy finally got there, he mounted me 4 new tires with only a duck bill hammer. If I had to use a duck billed hammer to change those tires I'd probably still be in Florida. I doubt I'd even have the strength to ruin a Nomar tip base on your experience!
Thanks again, Pete
Logged
longrider
Member
*****
Posts: 555


Vernon, B.C. Canada


« Reply #6 on: February 14, 2025, 05:29:14 PM »

Peteg

I will respond with photos in early April. 
Logged
longrider
Member
*****
Posts: 555


Vernon, B.C. Canada


« Reply #7 on: April 07, 2025, 06:27:11 PM »

Couple of photos


Logged
Peteg
Member
*****
Posts: 211


« Reply #8 on: April 08, 2025, 11:39:11 AM »

 I'll be changing my front tire in about a month. If I have issues I'll definately buy a Nomar bar.
Thanks for the help.
Logged
turtle254
Member
*****
Posts: 423

Livingston,Texas


« Reply #9 on: April 08, 2025, 12:22:52 PM »

Couple of photos


What threads size are in the main stand for the shaft that go thru bearings, 3/4" shaft with threads of what size? I want to make that shaft, but can't measure down in the main stand to get the size.
Logged
longrider
Member
*****
Posts: 555


Vernon, B.C. Canada


« Reply #10 on: April 09, 2025, 07:32:06 AM »

I cut the original shaft off just above the threads and welded it to the correct size stock. 
Logged
turtle254
Member
*****
Posts: 423

Livingston,Texas


« Reply #11 on: April 09, 2025, 08:03:55 AM »

I cut the original shaft off just above the threads and welded it to the correct size stock. 
any ideal what size threads and dia.?  7/8" course maybe ?
Logged
Peteg
Member
*****
Posts: 211


« Reply #12 on: April 09, 2025, 04:24:58 PM »

I'm using a 3/8" x 12"lg pipe nipple (1/2" pipe won't fit). I turn the Harbor freight bar thread side up and the nipple goes inside the open end and the threaded hole in the 3 arm table. I put threaded brass caps on my nipple and ground them down for a snug fit, but that's really not necessary. If you have an old wheel bearing around just bring it with you when you go to buy the bar or pipe. I just measured an old inner race id at 0.789" so 3/4" bar should have about 14 thousands clear.


Logged
Peteg
Member
*****
Posts: 211


« Reply #13 on: April 10, 2025, 11:22:24 AM »

I'm using a 3/8" x 12"lg pipe nipple (1/2" pipe won't fit). I turn the Harbor freight bar thread side up and the nipple goes inside the open end and the threaded hole in the 3 arm table. I put threaded brass caps on my nipple and ground them down for a snug fit, but that's really not necessary. If you have an old wheel bearing around just bring it with you when you go to buy the bar or pipe. I just measured an old inner race id at 0.789" so 3/4" bar should have about 14 thousands clear.

Actually for what it's worth my nipple is 18" long which puts it 6 or 8" into the harbor freight pole making it all pretty rigid. I think it was $6 on amazon. You might find that 1/2" emt works well.


Logged
BJ Fisher
Member
*****
Posts: 3


« Reply #14 on: April 12, 2025, 01:44:02 PM »

Just curious, I  can't seem to get the motorcycle adapter for the Harbor freight changer.  Any other recommendations  for someone new to this?
Logged
Pages: [1]   Go Up
Send this topic Print
Jump to: