|
JaysGone
|
 |
« on: July 25, 2012, 03:19:07 PM » |
|
Guys I went to change the rubber hose line on the neck fitting going to the overfill bottle and just my luck.
It snapped off the filler neck.
I plugged it to get home.
Since its aluminum and must happen to cars radiators all the time.
Yah all think its an easy fix for a radiator shop??
Car radiators are a dime a dozen and cheap.
Ours...............NOT.
Not cheap even used and beat up.
Any suggestions out there??
Please dont suggest JB Weld.
I dont believe it will hold up under the pressure.
It didnt on an exhaust pipe I tried it on blew right out in a few days.
Or should I just silver solder it back on myself??
Thanks guys.
|
|
|
|
|
 Logged
|
 1999 Valk - SOLD 2005 Yamaha RoadStar 2010 GoldWing with Motor Trike Kit |
|
|
MP
Member

Posts: 5532
1997 Std Valkyrie and 2001 red/blk I/S w/sidecar
North Dakota
|
|
« Reply #1 on: July 25, 2012, 03:29:47 PM » |
|
Have you asked a radiator shop? If you have the skills, should be able to do it yourself too.
MP
|
|
|
|
|
Logged
|
 "Ridin' with Cycho" |
|
|
Former BMW Guy
Member
Posts: 523
Aut viam inveniam aut faciam.
Apple Valley, MN
|
|
« Reply #2 on: July 25, 2012, 05:08:14 PM » |
|
If you know how to solder; i.e., sweat pipe, then its no biggie.
If you don't; then take it to a radiator shop.
Joe P
|
|
|
|
|
Logged
|
Motorcycling is not, of itself, inherently dangerous.
It is however, extremely unforgiving of: inattention, ignorance, incompetence or stupidity.
|
|
|
|
Brian
|
|
« Reply #3 on: July 25, 2012, 05:25:11 PM » |
|
If you know how to solder; i.e., sweat pipe, then its no biggie.
If you don't; then take it to a radiator shop.
Joe P
You can't use typical lead solder on aluminum. Try a radiator repair shop. NAPA may have something. The pressure these produce is not that much at the point of connection since it empties into a bottle that is open to the atmosphere. There used to be an aluminum expoy used to repair freezers in refrigerators. Graingers or McMaster Carr may have something. Gorrila glue? This stuff is tuff. Good luck. Let us know what you find. |
|
|
|
|
Logged
|
|
|
|
|
Michvalk
|
|
« Reply #4 on: July 25, 2012, 06:54:13 PM » |
|
I don't believe there is much actual pressure on the overflow. Hot coolant will flow out after the pressure cap lets it out (if it does), and will have suction when needed for fluid balance. I would think it would be possible to resolder the overflow nipple back on without removing the radiator, with the proper solder. No real experience, so just an opinion  |
|
|
|
|
Logged
|
|
|
|
|
JaysGone
|
|
« Reply #5 on: July 25, 2012, 07:34:11 PM » |
|
I appreciate the replies. Yes I can sweat a fitting if its brass or copper. This isnt. I can silver solder it if I have to but I feel Id be better off trying to make a new fitting itself.. Aluminum this thin is tuff to work with. Its maybe a 1/16th thick guys. Im actually looking for suggestions on how to make the fitting itself so to speak. Its the strength of it Im concerned with. This is some really thin aluminum this is made out of. A propane torch would more then likely melt it. It has to be in my opinion soldered back on, if Im to reuse the busted fitting. The fitting broke off flush with the neck filler. Id have to hold it from the inside of the filler neck and fill in all the way around it. That in its self will be extremely thin and weak if I use a lead/tin type solder. If it had just snapped in half no big deal. It broke off completly flush with the neck. And it has to be completely flush inside the filler neck to fit with the cap. NO I have not brought it to a radiator shop as Im looking for suggestions to MAKE a new fitting. Not really how to solder it. IE: what to use?? Material wise?? Copper tubing??, Maybe even a metal valve tire stem something of that nature guys. I have no desire to remove the radiator and bring into a repair shop. Its been over 100 degrees in my garage the last few days. Too hot to work outside for me. For any more then a few minutes at a time. The nut and bolt was barely good enough to get me home. It pissed fluid the whole ride home. Practically emptied the radiator. 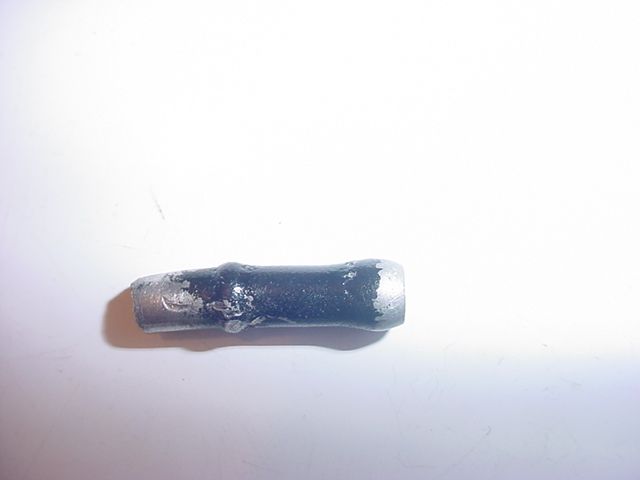 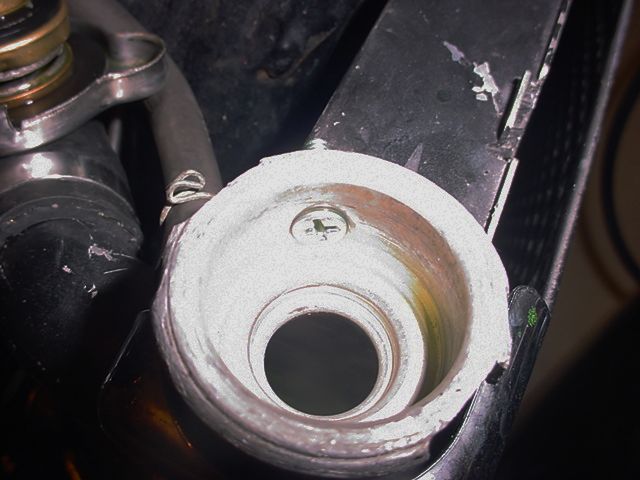  |
|
|
|
« Last Edit: July 25, 2012, 07:38:41 PM by JaysGone »
|
Logged
|
1999 Valk - SOLD 2005 Yamaha RoadStar 2010 GoldWing with Motor Trike Kit
|
|
|
jer0177
Member
Posts: 556
VRCC 32975
Pittsburgh, PA
|
|
« Reply #6 on: July 25, 2012, 07:52:16 PM » |
|
It shouldn't have emptied the radiator - the overflow (expansion) tank is there to catch a small amount of coolant that the radiator expels when it warms up. If it emptied the radiator past the nut/bolt stopper, it would have emptied it into the expansion tank, which would have eventually overflown onto the ground.
I'd like to see a better picture of the filler neck without the plug in it.
I have had to repair this type of fitting on a brass radiator before, but the fitting just popped out of the hole and I was able to sweat it back in.
|
|
|
|
|
Logged
|
|
|
|
|
JaysGone
|
|
« Reply #7 on: July 25, 2012, 09:26:13 PM » |
|
Brass or copper would never be an issue to repair.
I used a convex head screw so it would sit flush and let the cap go back on.
The pressure built up because it had no place to go as it began to actually over heat.
It the coolant was under so much pressure it blew by through the threads of the bolt itself.
I took out enough coolant using paper towels to have it just cover the fins no more.
It was a 25 minute 13 mile ride home and it about emptied the radiator.
Ill figure out a way to form a brass tube and try to sweat it on with silver solder from the inside of the neck.
Used on eBay are 249$$ thats rediculous.
Ill also call a few shops friday.
This has to be a pretty common thing on cars happening.
For giggles I looked up a new radiator for my 97 Merc.
All of 88$.
I doubt anyone fixes these things today.
Guys who can do aluminum are dinosaurs.
Unfortunatly we are in a toss and replace world.
I dont live in this world as a locksmith with 40 years experience.
I make the part when needed.
When its drawing fluid from the radiator overflow back into the bottle it also draws at the same rate from the return at the bottom.
As I understand how a radiator works.
How else would the coolant have a constant level??
I could be wrong on this theory however.
|
|
|
|
|
Logged
|
1999 Valk - SOLD 2005 Yamaha RoadStar 2010 GoldWing with Motor Trike Kit
|
|
|
|
dreamchaser
|
|
« Reply #8 on: July 25, 2012, 10:53:47 PM » |
|
I am not aware of any solder, silver or otherwise, that will form a bond with Aluminum. A torch will heat it either not enough or way too fast. Perhaps you can call a radiator shop in your area and ask them for advice. This is their area of expertice and I doubt they will allow you to make a tragic error: it wouldn't look good on thier expertice list. Just a thought. Hope it works.
|
|
|
|
|
Logged
|
|
|
|
valkyriemc
Member
Posts: 392
2000 blu/slvr Interstate, 2018 Ultra Limited
NE Florida
|
|
« Reply #9 on: July 26, 2012, 01:37:33 AM » |
|
Have you considered this type of repair? http://durafix.com/ |
|
|
|
|
Logged
|
Veteran USN '70-'76
|
|
|
jer0177
Member
Posts: 556
VRCC 32975
Pittsburgh, PA
|
|
« Reply #10 on: July 26, 2012, 02:06:56 AM » |
|
Ill figure out a way to form a brass tube and try to sweat it on with silver solder from the inside of the neck.
Brass and aluminum don't get along. See here for more information Aluminum and most metals don't get along - your best bet is to clean up and re-use the aluminum nipple with something like the durafix mentioned here. |
|
|
|
|
Logged
|
|
|
|
|
BradValk48237
|
|
« Reply #11 on: July 26, 2012, 03:40:45 AM » |
|
Heck....
Good old JB weld might work?! I've used it on many things. Always seem to work. I keep it in the saddle bags for that reason.
Can't hurt to try...
Brad
|
|
|
|
|
Logged
|
|
|
|
|
JaysGone
|
|
« Reply #12 on: July 26, 2012, 04:10:18 AM » |
|
Again all good ideas.
The problem as I see it is this is such a thin tube I cant see even the Dura Fix working.
If it was a chunk or bar of aluminum needing filling in a spot thats one thing.
This is an unsupported tube. And will have no real bearing surface too weld.
I did consider JB Weld.
I do and have used it to repair holes drilled into safe doors with alot of success.
I for the life of me see no way to do this repair.
I feel someone, not me might be able to Tig weld this.
Ive alsways hated working with aluminum.
Im going to have to call some radiator shops and do some traveling.
Looks as though Im not going to have a choice.
Or just go for a beat up no guarentee $250 used piece off of ebay.
What a PIA this is going to be...........
PinWall being the only real source for a used part.
And my last resort.
They have worked with me before on parts rebuilding this bike and have taken back stuff that wasnt any good.
Even though they say they dont.
|
|
|
|
|
Logged
|
1999 Valk - SOLD 2005 Yamaha RoadStar 2010 GoldWing with Motor Trike Kit
|
|
|
|
BradValk48237
|
|
« Reply #13 on: July 26, 2012, 04:33:52 AM » |
|
Heck...
Good old JB weld might just do the job
Brad
|
|
|
|
|
Logged
|
|
|
|
MP
Member
Posts: 5532
1997 Std Valkyrie and 2001 red/blk I/S w/sidecar
North Dakota
|
|
« Reply #14 on: July 26, 2012, 04:51:45 AM » |
|
Heck...
Good old JB weld might just do the job
Brad
I would try it too. Clean up both real good. Scratch a little with steel wool coarse. Put JB on both sides. If it fails, go to plan B. There is no pressure at that point. Just hot and liquid. I would give it at least a 95% chance of success, assuming you do good prep work so all remnants of antifreeze are removed. MP |
|
|
|
|
Logged
|
"Ridin' with Cycho" |
|
|
|
Ricky-D
|
|
« Reply #15 on: July 26, 2012, 08:01:04 AM » |
|
It looks to me that you are half the way there to a fix.
I see only two more hurdles to a good repair.
I think a hollow bolt/screw would be a good choice, you could drill out the bolt you have already installed.
The hole size is not critical at all, coolant just needs a place to go.
Sealing the bolt in the neck might be an impediment but not insurmountable. It has to be air tight to work properly.
Seems you got it!
***
|
|
|
|
« Last Edit: July 27, 2012, 06:54:57 AM by Ricky-D »
|
Logged
|
2000_Valkyrie_Interstate
|
|
|
|
Hef
|
|
« Reply #16 on: July 26, 2012, 08:52:06 AM » |
|
I think it can be fixed by welding. There is a fabricating shop here who will do any job big or small. I have seen him weld an aluminum soda can in a demo. He welded a high pressure aluminum tube on an air compressor for me and it was good until the unit died. There is probably an operation like his somewhere in your area. Good luck, I hope you get it fixed. Hef
|
|
|
|
|
Logged
|
|
|
|
|
|
|
JaysGone
|
|
« Reply #18 on: July 26, 2012, 03:49:16 PM » |
|
Thats unfortunatly where it broke right at the nipple part. Its still partially in the radiator neck. So here is what Im going to do. I made a fitting from brass, drilled it and threaded it. I am enlarging the hole in the radiator neck just a tad to make a nice tight fit. Or tap out the remainder of the broken piece in the neck if I can easily. Im going to tap it in from inside the neck, with just a dab of permatex for metal just a little specks worth to seal it from the inside. Use a rubber washer to hold it in place if needed from the outside and let it dry. Then maybe if I feel it will help. A bit of JB weld for metal. New line and that should do it. The fitting I made is in the center of the picture. I made it from a solid brass stud I had in the shop, on the right, drilled of course and flanged thin enough to tap it to the neck shape if needed. I got this idea from the water filter insert on the left in the picture thats just a tad to short to make me happy. It should all work out fine. It does in my mind anyway. So thanks guys for all the suggestions. Ive taken a few of your suggestions, and mixed them all up into this fitting that should work fine. 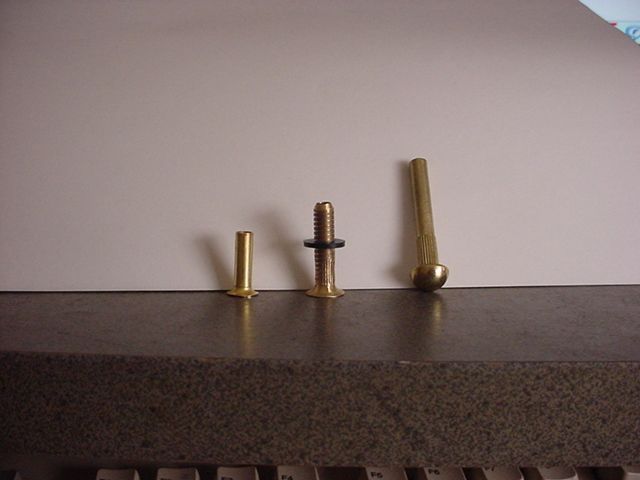 |
|
|
|
|
Logged
|
1999 Valk - SOLD 2005 Yamaha RoadStar 2010 GoldWing with Motor Trike Kit
|
|
|
|
JaysGone
|
|
« Reply #19 on: July 26, 2012, 03:54:03 PM » |
|
Ill figure out a way to form a brass tube and try to sweat it on with silver solder from the inside of the neck.
Brass and aluminum don't get along. See here for more information Aluminum and most metals don't get along - your best bet is to clean up and re-use the aluminum nipple with something like the durafix mentioned here. Im glad you made this post for me to learn a bit. I again admit my knowledge here is very limited but I do understand how a battery works. Im hopping here that antifrezze ad brass will mix with aluminum as long as no current is involved. If Im wrong and the odds of my life so far with this bike tell me. Im 50/50 at best. But Im taking the chance anyway. Thanks for the read...... Jay |
|
|
|
|
Logged
|
1999 Valk - SOLD 2005 Yamaha RoadStar 2010 GoldWing with Motor Trike Kit
|
|
|
|
JaysGone
|
|
« Reply #20 on: July 26, 2012, 03:55:42 PM » |
|
It looks to me that you are half the way there to a fix.
I see only two more hurdles to a good repair.
I think a hollow bolt/screw would be a good choice, you could drill out the bolt you have already installed.
The hole size is not critical at all, coolant just needs a place to go.
Sealing the bolt in the neck might be an impediment but not insurmountable. I has to be air tight to work properly.
Seems you got it!
***
We are both on the same page here in thought. I hope the right book too. Jay |
|
|
|
|
Logged
|
1999 Valk - SOLD 2005 Yamaha RoadStar 2010 GoldWing with Motor Trike Kit
|
|
|
|
Brian
|
|
« Reply #21 on: July 26, 2012, 04:55:34 PM » |
|
It looks to me that you are half the way there to a fix.
I see only two more hurdles to a good repair.
I think a hollow bolt/screw would be a good choice, you could drill out the bolt you have already installed.
The hole size is not critical at all, coolant just needs a place to go.
Sealing the bolt in the neck might be an impediment but not insurmountable. I has to be air tight to work properly.
Seems you got it!
***
I agree with you and Ricky here. If you decide to try that durafix rod I would practice on an aluminum gutter first. In my younger days doing commercial heating work I temporarily fixed a heating hot water leak on our church bolier with an epoxy that plumbers use. This leak was on a four inch copper fitting, my repair lasted for 10 years till the church decided to upgrade to a more effecient boiler. The product was made by Oatey and may now be sold at Lowes or Home Depot.
We are both on the same page here in thought. I hope the right book too. Jay |
|
|
|
|
Logged
|
|
|
|
|
JaysGone
|
|
« Reply #22 on: July 26, 2012, 05:21:18 PM » |
|
No I didnt even consider the Dura fix way.
For what would have amounted almost a half inch worth at its cost nahhh.
Wasnt going to happen.
I just drilled out the remaining piece of aliminum in the neck.
A bit more sloppily then my usual Im affraid to say.
Tapped in the brass fitting with a touch of permatex on the inside of my home made flange piece.
Its now held in place with a pair of vice grips lightly. Till dry.
Tommorow Ill need maybe a quarter inch worth of JB weld putty and Im done.
At zero cost to me $$$ wise.
A little black spay paint couldnt hurt too.
|
|
|
|
|
Logged
|
1999 Valk - SOLD 2005 Yamaha RoadStar 2010 GoldWing with Motor Trike Kit
|
|
|
art
Member
Posts: 2737
Grants Pass,Or
Grants Pass,Or
|
|
« Reply #23 on: July 26, 2012, 05:24:12 PM » |
|
A permenent fix would to find a good welder and make a new tube to fit from inside and have him tig weld it.Somebody used to welding on aircraft parts .I've had it done on carberators.
|
|
|
|
« Last Edit: July 26, 2012, 05:26:28 PM by art »
|
Logged
|
|
|
|
|
JaysGone
|
|
« Reply #24 on: July 27, 2012, 07:15:32 AM » |
|
I did eventually speak with a guy who said he could TIG weld it but.
He suggested the part obviously also be aluminum.
Then when I said it would 100% have to be flush on the inside of the neck in order for the cap to fit.
He then suggested he could do it if I removed the radiator so he could get to the bottom of the piece.
I found no source for any tubing that size and in say a 12 inch piece minimum.
So not being able to find the tubinng in any small quanity and having to remove the radiator I went with my way.
Since its under no pressure etc.
I should be fine.
Going out now to fill and start it up..........................BRB
|
|
|
|
|
Logged
|
1999 Valk - SOLD 2005 Yamaha RoadStar 2010 GoldWing with Motor Trike Kit
|
|
|
|
JaysGone
|
|
« Reply #25 on: July 27, 2012, 08:15:52 AM » |
|
Leaked............bummer.
JB weld and aluminum not a good thing.
Now trying to drill out a #7 allen head bolt and make a banjo type bolt.
After that if it doesnt work.
Off to a Fastanall Store and see what if anything they have.
To those who think this isnt under any pressure......sure it is.
As the spring in the cap acts like a thermostat and opens. The gap under the cap and hot fluid in the radiator is what creates the overflow to the tank.
|
|
|
|
|
Logged
|
1999 Valk - SOLD 2005 Yamaha RoadStar 2010 GoldWing with Motor Trike Kit
|
|
|
art
Member
Posts: 2737
Grants Pass,Or
Grants Pass,Or
|
|
« Reply #26 on: July 27, 2012, 10:45:18 AM » |
|
If you don't fix it right it will bite you in the ass .You will be out in the middle of BFE an no way to get home.Either weld it or replace it.Glue,epoxy etc. under heat and pressure I would not trust.
|
|
|
|
|
Logged
|
|
|
|
|
JaysGone
|
|
« Reply #27 on: July 27, 2012, 01:57:43 PM » |
|
Art unfortunatly your 100% correct.
Ill get a used one eventually.
The 5 or 6 that PinWall have look like crap.
This radiator isnt repairable <here>.
I just spent the last 6 hours driving all over this god forsaken no trades people worth a crap area.
I cant believe nobody has a treaded anything rod thats hollow 1/4 or 3/16ths on an inch in diameter.
My last straw was drilling out the center of a few brass bolts.
Very hard with no drill press.
None came out good enough to use.
Too hot I give up!!!!!!!!!!!!!!!
For now.
Ill just use the Yamaha till whenever.......
|
|
|
|
|
Logged
|
1999 Valk - SOLD 2005 Yamaha RoadStar 2010 GoldWing with Motor Trike Kit
|
|
|
jer0177
Member
Posts: 556
VRCC 32975
Pittsburgh, PA
|
|
« Reply #28 on: July 27, 2012, 03:01:12 PM » |
|
To those who think this isnt under any pressure......sure it is.
As the spring in the cap acts like a thermostat and opens. The gap under the cap and hot fluid in the radiator is what creates the overflow to the tank.
If you have pressure there, you need to look for an obstruction in your overflow hose, the overflow tank or the vent hose for the overflow tank because there are no valves, no thermostats, no restrictions other than tubing diameter between the topside of the radiator cap seal (the one with the spring on it) and the open air. To have pressure greater than ambient, you need flow and restriction. |
|
|
|
|
Logged
|
|
|
|
jer0177
Member
Posts: 556
VRCC 32975
Pittsburgh, PA
|
|
« Reply #29 on: July 27, 2012, 03:03:21 PM » |
|
Well since you're not worried about galvanic corrosion, have you looked into steel brake line sections from the auto parts store?
|
|
|
|
|
Logged
|
|
|
|
|
JaysGone
|
|
« Reply #30 on: July 27, 2012, 04:50:32 PM » |
|
Nope thats tomorrows run around auto parts places.
HUH???
I think your missreading me here or Im misstyping something.
Who is saying there is pressure in the over fill bottle?????
I never did.
No pressure in a radiator????
Fluid heats up, the spring acts like a thermostat does. It shrinks a bit and hot pressurised water anti freeze whatever is released through the vent to the tank.
I know it has pressure.
If you know it has no pressure.
Open it up hot and then tell me, there isnt any pressure in there.
Nothing is clogged anywhere...................
|
|
|
|
« Last Edit: July 27, 2012, 05:12:56 PM by JaysGone »
|
Logged
|
1999 Valk - SOLD 2005 Yamaha RoadStar 2010 GoldWing with Motor Trike Kit
|
|
|
art
Member
Posts: 2737
Grants Pass,Or
Grants Pass,Or
|
|
« Reply #31 on: July 27, 2012, 05:58:43 PM » |
|
Art unfortunatly your 100% correct.
Ill get a used one eventually.
The 5 or 6 that PinWall have look like crap.
This radiator isnt repairable <here>.
I just spent the last 6 hours driving all over this god forsaken no trades people worth a crap area.
I cant believe nobody has a treaded anything rod thats hollow 1/4 or 3/16ths on an inch in diameter.
My last straw was drilling out the center of a few brass bolts.
Very hard with no drill press.
None came out good enough to use.
Too hot I give up!!!!!!!!!!!!!!!
For now.
Ill just use the Yamaha till whenever.......
i have a small lathe,send me a PM with your add. and I will send you several bolts and you can try them.Art |
|
|
|
|
Logged
|
|
|
|
valkyriemc
Member
Posts: 392
2000 blu/slvr Interstate, 2018 Ultra Limited
NE Florida
|
|
« Reply #32 on: July 27, 2012, 06:52:44 PM » |
|
|
|
|
|
|
Logged
|
Veteran USN '70-'76
|
|
|
|
JaysGone
|
|
« Reply #33 on: July 27, 2012, 07:27:57 PM » |
|
$$ are never an issue with me and bikes.
Or guns but thats another deal.
I did see that today in of all places HomeDePot.
This type of break cant easily be soldered properly actually.
If it had come 100% out of the neck intact, soldering would be no problem for almost anyone.
This nipple is so thin, its just not really applicable to a repair.
Welding is out of the question.
It literally snapped in half.
So it would not only have to be supported.
The repair would be such a big blob of solder in relation to its diameter.
Heating it up, Id almost guaranty it would crumble first its that thin..
They say 750 degrees?? Never make it.
|
|
|
|
|
Logged
|
1999 Valk - SOLD 2005 Yamaha RoadStar 2010 GoldWing with Motor Trike Kit
|
|
|
jer0177
Member
Posts: 556
VRCC 32975
Pittsburgh, PA
|
|
« Reply #34 on: July 27, 2012, 09:14:18 PM » |
|
Nope thats tomorrows run around auto parts places.
HUH???
I think your missreading me here or Im misstyping something.
Who is saying there is pressure in the over fill bottle?????
I never did.
No pressure in a radiator????
Fluid heats up, the spring acts like a thermostat does. It shrinks a bit and hot pressurised water anti freeze whatever is released through the vent to the tank.
I know it has pressure.
If you know it has no pressure.
Open it up hot and then tell me, there isnt any pressure in there.
Nothing is clogged anywhere...................
Aah. I see now. There is pressure in a radiator, however, the spring in the radiator cap does not act like a thermostat, and does not shrink. I took some pictures of the cap from my Valk, yours should look the same if it's factory: First, the top of the cap:  1.1 means 1.1 bar of pressure, which is just shy of 16 pounds per square inch (actually, 15.9541512 psi). This is the rating of the radiator cap - the pressure in the radiator should only build up to 16psi before the cap releases it. Next, the anatomy of the cap:  Parts A and B are rubber seals. They form a "no-pressure" chamber inside the filler neck of the radiator, which vents to the overflow bottle, through the broken nipple that started this thread. If you have pressure in this area, you have a problem. Seal B, along with the spring, keeps 16psi inside the radiator - and it does so to allow the coolant to reach a higher temperature before it begins to boil. As the coolant heats up and expands, pressure is created inside the cooling system, and pushes against seal B (and everything else), until it reaches 1.1bar (16psi) and overpowers the spring, allowing coolant to escape into the unpressurized chamber created between seal A and B, and the plumbing directs it into the overflow bottle. Yes, if you remove a cap from a hot radiator, you release the fury of now boiling (as it's unpressurized) coolant onto your face, because you have removed the chamber that is created by the 2 seals. This is never advisable! The small metal disc, "C", is a one-way valve, with a much weaker spring holding it closed. It prevents coolant from escaping the radiator (that's the direction it stops flow in), but allows it to re-enter from the overflow bottle as the coolant in the radiator cools and contracts. The next picture shows this valve being opened by hand:  I hope this helps in the repair of the broken nipple. I'm thinking it may be possible to use a steel brake line section with a flared end - put the section through so that the flared end is inside the neck, and you may be able to sweat it into the neck by heating up the brake line only, of course protecting the surrounding area from the torch. |
|
|
|
|
Logged
|
|
|
|
|
JaysGone
|
|
« Reply #35 on: July 27, 2012, 09:37:14 PM » |
|
Intresting information.
The cap I have is a NAPA cap I was told by others here to use.
I believe its for an older Mustang??
Its similar but not as complex as the original you pictured.
Might be something to look into.
I will take a look tomorrow at the brake parts.
Art has come up with a good remedy for me, which if it works I will mention at a later date.
Thanks
Jay
|
|
|
|
|
Logged
|
1999 Valk - SOLD 2005 Yamaha RoadStar 2010 GoldWing with Motor Trike Kit
|
|
|
|
Brian
|
|
« Reply #36 on: July 28, 2012, 04:44:57 AM » |
|
You all might call me crazy here, but here goes. Just this year after changing the coolant I developed a leak coming off the bottom connect of the overflow bottle. Further investigation revealed that the original coolant bottle overflow hose connection hole was not open to the bottle.  My 97 was never really been vented correctly from the get go. Now, being somewhat old school I never fill a radiator to the top of the core when changing fluid to leave room for the coolant expansion, remember when older cars did not use a an overflow bottle? This time I topped it off making the cap lift to relieve pressure and fluid. This explained why the coolant fluid in the bottle always appeared to look new. Now, if this were me and knowing this fact I would drain some coolant out, plug that hole and ride it while I was working on a real correction. The other hoses will expand as needed but you need leave free space in the radiator. IMHO. I had a spare bottle so I switched it out. Making sure the hose connection was open. I later then drilled out the original bottle connection. I picked up a box of spare parts from a neighbor who built a custom valk starting with a 98 standard. This low cost deal has paid off twice. |
|
|
|
|
Logged
|
|
|
|
|
JaysGone
|
|
« Reply #37 on: July 28, 2012, 05:23:33 AM » |
|
Thats how I drove the bike home from work.
After I broke the nipple off I put a bolt and nut in there.
Using paper towels sopping up the fluid till it was just at the top of the fins.
Its my using the bolt that got me into this predicament.
I smashed down what was left of the broken nipple not relising that there was still a piece of it in the neck actually.
So I ended up with no flush mating surfaces to solder it back together.
The fluid still expanded enough to leak around the threads as I rode home.
Then made matters worse once home, trying to knock the remainder of the fitting out of the neck.
You would think that should be enough and why do we even need an overfill tank??
My guess its to relieve the pressure build up and not blow off a hose.
I wish I could leave say 2/3rds the juice in and just ride it.
But you cant get away with that for long Id surmise and I for one who always takes a chance.
Would end up doing some harm some way to the engine.
Last month when I flushed the radiator I checked all the lines and the over flow tank etc.
Nothing was clogged.
This was all my own doing in just wanting to change out the bottom vent line.
I took the wire clamp off and instead of cutting off the old dried up hose as I should have.
I tugged on it, and p00f the fitting broke in 2 in my hand.
I said it enough times already but this is the thinnest piece of cast aluminum Ive ever seen.
Im really suprised this hasnt happed to alot of others out there before me.
I honestly expected this to be a really easy cut and dry fix.
Far from it.
Bust it off on any car radiator.............just get a new or used radiator they are plenty cheap.
So no trades folks out there able to fix the blasted thing.
A 6 year limited number of bikes made.
Over ten plus years ago.
4 or 5 stinking used radiators out there.
At $250 bux, beat up to boot.
Lord knows what a new radiator would be or even if you could get one if wanted.
Ive really come to like this bike and still want to use it as my future trike.
But darned if it isnt the biggest PIA to fix the small things.
|
|
|
|
|
Logged
|
1999 Valk - SOLD 2005 Yamaha RoadStar 2010 GoldWing with Motor Trike Kit
|
|
|
|
Chrisj CMA
|
|
« Reply #38 on: July 28, 2012, 06:34:29 AM » |
|
OK already.......just send me your bike...Ill fix it and you wont have anything to whine about.........You can get a HD, at least parts are available  |
|
|
|
|
Logged
|
|
|
|
|
RP#62
|
|
« Reply #39 on: July 28, 2012, 08:23:56 AM » |
|
Jay, why couldn't the original piece be tigged on? You'd loose a little length, but length's not critical here. Even it it couldn't be tigged all the way around to make a waterproof seal, it could be tacked on to hold it structurally, then sealed with jb weld.
-RP
|
|
|
|
|
Logged
|
|
|
|
|


